Set up Apple and Google Wallet passes
Overview
Let customers add your loyalty program to Apple Wallet or Google Wallet. The pass lives in the customer's phone, so your program is always top of mind: your brand is one swipe away and the pass shows their points balance, VIP tier, paid membership and Shopify store credit. It updates automatically, so customers always see their current balance without opening your store.
The pass also makes in-store checkout faster. Staff scan the QR code on the pass in Shopify POS to find the customer instantly and add them to the cart, then redeem rewards or add a membership.
Set up the pass
- Go to the "Integrations" page in the app and click Set up on Apple & Google Wallet
- In the General Settings card set the dropdown to Enabled and fill in the settings:

- Organization Name: Your brand name, shown on the pass
- Launch URL: The page that opens when the customer taps the pass, for example your loyalty page
- Background Color: The background color of the pass
- Label Color and Foreground Color: Text colors, Apple Wallet only. Google Wallet picks its own text colors
- Hide brand name in heading: Apple Wallet only. Google Wallet always shows the organization name
- Point value: How much one point is worth in your store currency. Used by the "Points balance as money" field
- In the Apple Wallet card upload the images and choose the fields (see below):
- Logo: 480x150 PNG
- Icon: 480x480 PNG
- Hero image: 1125x432 PNG
- In the Google Wallet card enter the Program name, upload the images and choose the fields:
- Logo: 660x660 PNG. Google Wallet masks the logo into a circle, so use a square image
- Hero image: 1032x812 PNG
- Save the changes
Choose what the pass shows
Each field on the pass has a Type, an optional Label and, for the Text type, a Text box.
Available types:
- None: The field is not shown
- Points balance: The customer's points
- Points balance as money: Points multiplied by your Point value, in your store currency
- VIP tier status: The customer's VIP tier. Only shown if VIP tiers are enabled
- Paid membership status: The name of the customer's membership, or "-" if they don't have one. Only shown if paid memberships are enabled
- Shopify store credit: The customer's store credit balance
- Name: The customer's name
- Text: Any fixed text you enter
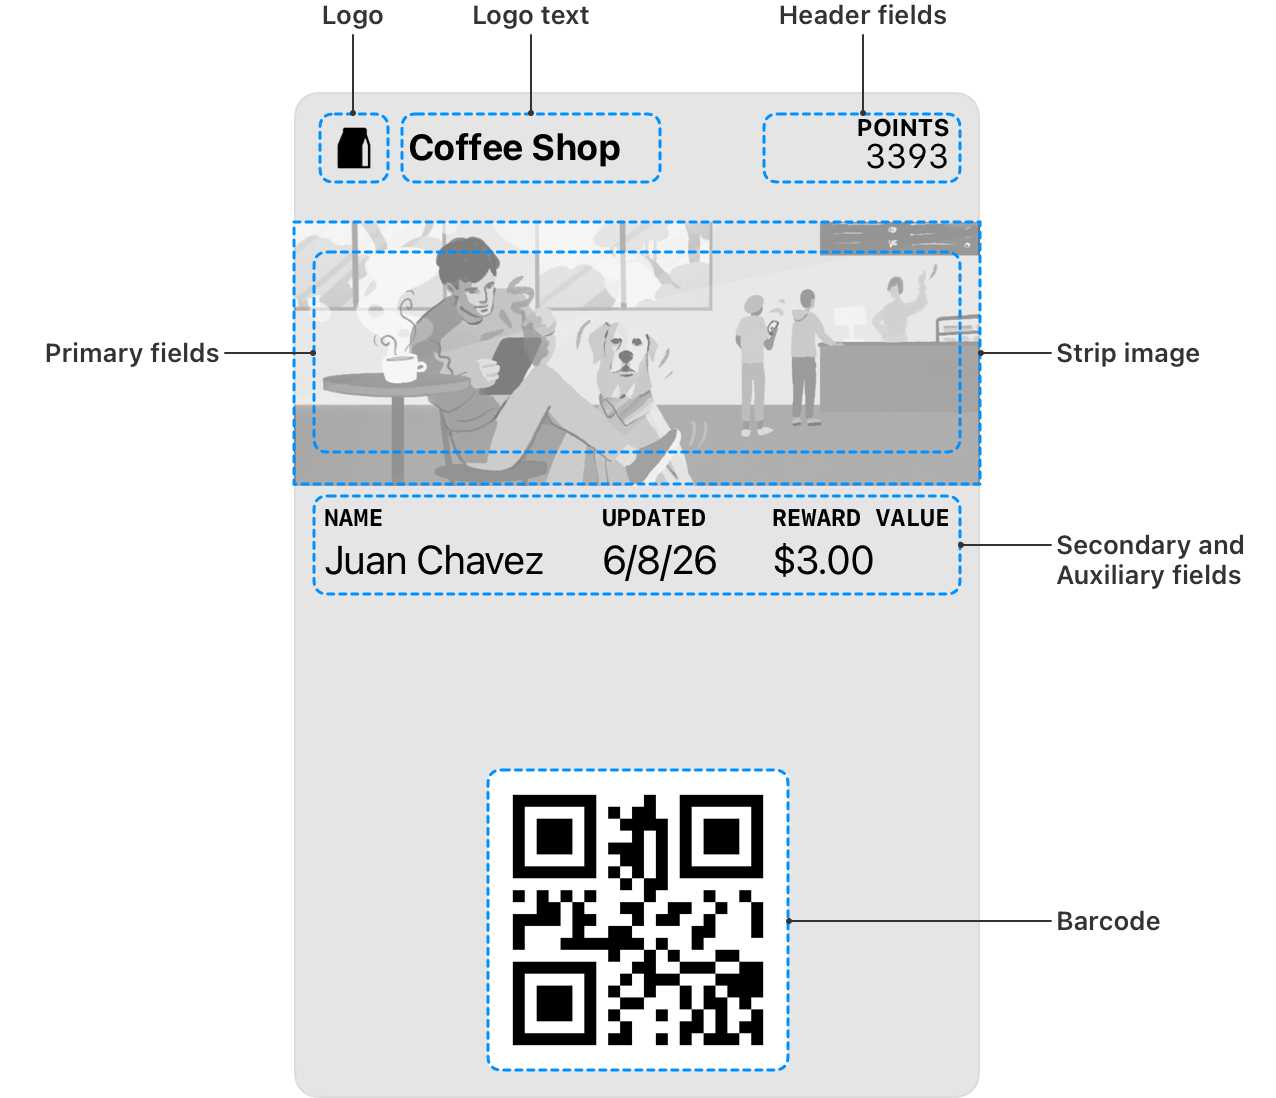
Apple Wallet fields: Header field (top right), Primary field (on the hero image), Secondary field (below the hero image, left), Auxiliary field (below the hero image, right) and QR code label (below the QR code).
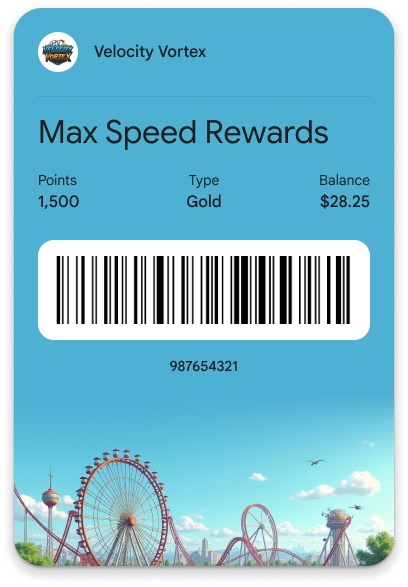
Google Wallet fields: Primary field, Secondary field (above the QR code, left), Auxiliary field (above the QR code, right) and QR code label (below the QR code). Google Wallet shows a dash when no QR code label is set.
By default the pass shows the points balance, the customer's name and their VIP tier.
Let customers add the pass
In the Storefront visibility card of the same page you can choose where customers can add the pass:
[Screenshot: "Storefront visibility" card, "Add block" button and the activation link highlighted]
- Customer accounts: Click Add block to open the checkout and customer accounts editor and add the "Add wallet pass" block to the Thank you, Orders, Order status and/or Profile pages
- Storefront: Add the "Love Loyalty: Hero banner" block to any page in the theme editor. Once the wallet pass is enabled an "Add to Wallet" button shows on that block
- Wallet Pass activation link: Copy the link and add it to your order confirmation email, or print it as a QR code in your store. Customers who open it add the pass in one click. Customers who aren't logged in are asked to log in first
On iPhones customers see the Apple Wallet button, on Android phones the Google Wallet button and on other devices both.
Change the texts: The title, subtitle and button texts can be changed in the "Wallet pass" section of the "Customize storefront" page in the app.
Scan the pass at POS
- Add the Redeem points & rewards tile or the Add paid membership to cart tile to your POS, see How to integrate Love Loyalty with Shopify POS?
- With no customer in the cart, tap the tile. The "Scan Customer QR Code" screen opens
- Scan the QR code on the customer's pass with a barcode scanner or the device camera. If a barcode scanner is connected the camera stays closed, tap Scan with camera to use it instead
- The customer is added to the cart and you can redeem rewards or add a membership
FAQ
Do customers need to be logged in to add the pass?
Yes. The pass belongs to the customer's loyalty account, so customers who aren't logged in are asked to log in first.
What does the QR code contain?
The customer's ID, which POS uses to find the customer. It is always on the pass.
Updated on: 17/11/2026
Thank you!